You probably already know from other articles here on 3DJournal that the right eye perceives objects shifted a bit more to the left than the left. This displacement is greater the closer the observed object is to the observer. So with that knowledge, let's get to drawing.
A 3D image can be created in different ways. The simplest one is to draw a 2D image and then create a version for the left and right eye. At this point, we would like to point out that it is not only the correct shapes and shifts between the right and left eye that matter, but also the colours chosen. Let's illustrate this with the following example.
Let's start
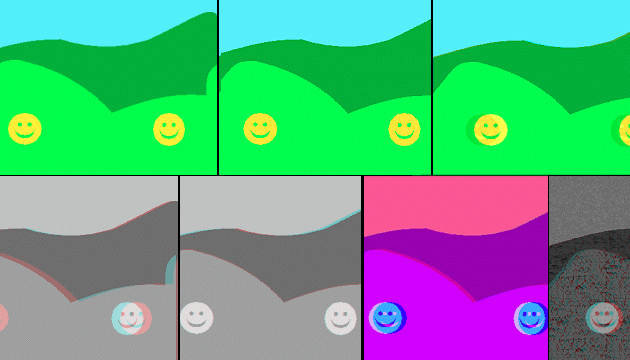
In the picture on this page you can see the sky, the distant and nearer hills and two faces. Although the image is flat, i.e. 2D, we suspect that the faces are closest and the sky is furthest away. To make a 3D image, you need to create two views - one for the left eye and one for the right eye.
We decide that this first image is the left eye view. We create the right eye view by moving objects that are closer to us a little to the left (because we know that the right eye sees things more to the left - and the closer they are to us, the more to the left it sees them).
In the graphical editor, the shift can be done in different ways. If you know how to work with layers, then it's easiest to put the objects in the image into layers according to how far they are from the observer, and then scroll through the layers. If you or your graphics editor can't work with layers, then when you shift, you always need to select what you want to shift (usually with the dashed rectangle tool) and then shift - and possibly colour in the space created by the shift.
Moving an object between the left and right images changes the position of the object in space.
In the second image you can see the right eye view. On its right edge, we intentionally left a gap that was created by shifting the layers.
Now load both images into 3DJournal and let the 3D image be created. The result is the third image. Try looking at it with 3D glasses. It doesn't look spatial at all. But why? Where did we go wrong?
Possible errors
One possible mistake is that we have moved the objects too little or too much for the right eye. Sure - it's possible to calculate exactly how big the shifts should be, but our work initially relies mainly on our guess.
The second possible mistake is that we have chosen the wrong colours. After all, blue-red glasses distort colours and filter out some of them. Try taking the composite images from our example in 3DJournal (you can save them by right-clicking and selecting them from the menu), creating a 3D image from them, and then using the arrow to move the image to place one under the other. See? One is almost black and the other is very light. This imbalance (not enough red components) then gets us into mischief when composing.
However, if you check the Black and White option, suddenly the situation changes. Suddenly the depth of the image is clearly visible. You can see the result in the fourth picture. (By the way - for your experiments, we recommend using larger images - it will be more noticeable on them).
Depth
Do one more experiment: while looking at the first black-and-white image, try moving your head closer and further away from the monitor. You'll find that at a certain distance - in this case, it should be about 1 meter - the image will be best seen. The objects in the front will look as if they are popping out of the screen. What is good to remember from this? That the displacement of objects in the left and right images also depends on the distance of the observer from the monitor (or the paper on which the 3D image is drawn).
And one more experiment: let's try to align the right and left images with the right/left arrows (in 3DJournal) so that the front objects in the left and right images (i.e. the faces) overlap. You will recall that originally we left the objects at the back in place and moved the ones at the front - towards the left. So now, actually, the front objects will be in place and the objects in the back will be shifted to the right relative to each other. And the result? Looking through the 3D glasses, you'll notice that the back objects now sort of sink into the screen, while the front ones are in the same plane as the screen. You can see this in the second black and white image.
Changes for the better
In the penultimate image you can see the result after we changed the colours so that the two components necessary for a correct 3D display - red and green-blue - are more evenly represented in the image. The 3D effect is now more apparent - although of course the sense of depth is strongest in the black and white version.
Now notice the last black and white image. It looks more plastic than all the others. Why? Because it doesn't have large areas of one simple colour, but areas with patterns. If you move the large colour area a little bit, it actually stays the same in most places - the same colour - in fact, it's like only the edges change. But if you move the area with patterns, the colours change everywhere - the sample shifts a little bit in all places. And that's the trick - 3D images prefer areas with a pattern rather than a solid colour.
Large monochrome areas make the 3D effect worse.
And one more note - if any elements in an image are going to protrude in front of the screen, they should never intersect the edges of the image that make up its frame.
Keep these rules in mind when creating 3D drawings - and 3D photographs. This will help you avoid errors that would impair the visibility of your 3D images.
3DJournal, July 2003