Let's not dwell on long introductions and let's go straight to the 3D conversions.
Creating a basic 3D image (stereoscopic image)
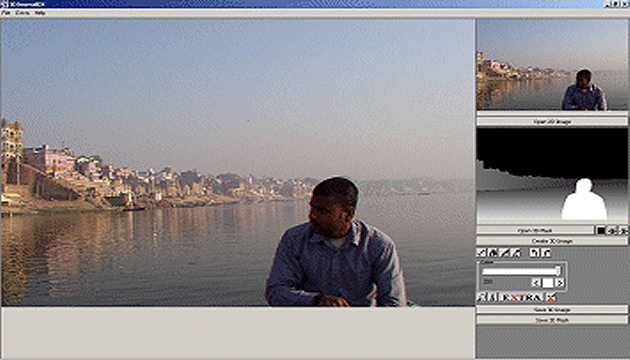
Choose any image or photo you want to convert to 3D. Upload it to 3DJournalDX by pressing the button on the top right. 3DJournal will then create a basic (blank, black) 3D mask and display it on the right. Press the Create 3D Image button to create a basic 3D image. With the 3D glasses on, you should see it as an image slightly offset beyond the surface of the computer display. The 3D image shows 'colour ghosts' which allow the eyes with the glasses to perceive the spatial image. (The relevant menu items can also be used in place of all the buttons mentioned.) Now what to do with it?
Easy to work with 3DJournalDX
An ordinary flat (2D) image is converted into 3D by means of a so-called 3D mask. With its help, you can usually quickly and easily tell the computer what the resulting 3D image should look like. The initial 3D mask is black. Try working with the mask:
1) Next to the Open 3D Mask button, click on the button with the black eye. (We assume that you have already uploaded your 2D photo and had a 3D image created.) (If you click the button again, it would show the 3D image again.)
2) Below the Create 3D Image button is a series of tool buttons. For example, click the button on the left - with the line image - and then click into the main window, which now shows the black mask. A white dot will appear. Move the mouse and click again. You have just drawn a line. Move the mouse, click. You can draw complex shapes from lines in this way. Note: Lines may appear dashed even though they are not actually dashed. This is because the mask is scaled down to the screen size.
The 3D mask will produce a 3D image later.
3) Make the lines into a closed shape, such as a square. Click on the tool next to the lines tool - the paint can. Click in the square. It will be colored. Caution: if any of the lines of the square are not tightened, the paint will "bleed" into the surrounding area.
4) If you press the brush button, you can draw individual points and make minor corrections to the 3D mask.
5) If you make a mistake while drawing, use the left arrow to reverse the last step. If you find that you didn't want to undo it, use the right arrow to undo the undo. Up to five last steps can be undone in this way.
6) Under the tool buttons, you can select the color (with the arrows or the drag). The lightest is white - number 255, the darkest black - number 0. If you want to select a color that is already used somewhere in the mask, you can also click on the pipette button and the corresponding mask location.
Creating a true 3D image
In our first basic 3D image, all parts of the image have been moved slightly beyond the plane of the computer monitor. Now you need to move the parts of the image that are closer to you forward. This can easily be done by marking those locations on the 3D mask with a lighter color. The lighter the color, the closer the location will be to you in the 3D image.

Example of a converted photo from 2D to 3D. On the left 2D, on the right 3D stereoscopic anaglyph.
An example: imagine a picture of a person standing with a car behind him and the wall of a house in the background. Now how to convert everything into 3D:
1) Use the colored eye button (next to the Open 3D Mask button) to set the image to display only 2D.
2) Use the "line" tool to outline the person in the foreground in white. Colour him in. Note: When drawing on the image, no changes are displayed (but you can see them in a reduced form on the right in the mask window). This is because you now only have the original image display turned on. Changes are, of course, recorded in the mask.
3) Set a slightly darker color (for example 200). Use the line tool to draw around the car. Colour it in.
4) Switch back to the 3D view with the color window button and see how the person, the car and the wall are now at different distances from you.
Tip: For a more plastic 3D view of the details, it is advisable to colour different parts of the objects differently. For example, make the protruding belly and nose a lighter colour, the hand behind the back a darker colour.
Saving the 3D image
Finally, save the 3D image. You can either save the whole image or just the selected cutout. You can also resize the image before saving. But more on that later. The format in which the image will be saved (bmp, jpg, png, jps, pns) is selected in the save window. For special stereoscopic jps and pns images, the left and right images are saved side by side crosswise (right left, left right). For other formats, the selected 3D image color coding is used.
You can also save the 3D mask for future use.
You can also save the 3D mask. For some graphically intensive editing of the 3D mask, it may be appropriate to edit it in an advanced graphics editor. You can then reload it into 3DJournalDX.
Advanced functions (the Extra button)
You can use the Extra button to call up the advanced functions of 3DJournalDX. Here you can:
1) Set the color coding of the image - the default is anaglyph for red/blue-green glasses, but you can also code for blue-yellow glasses and others.
2) Set the quality of the saved jpg image. We recommend to choose a higher quality, which allows a better 3D effect.
3) Save the current settings. The quality of the jpg, the 3D encoding method, any cropping or resizing, etc. are saved.
Advanced functions 2 (the X2 button)
Use the X2 button to open the 3DJournalDX advanced tools panel. Here you can:
1) Set the resizing of the image when saving.
2) Set the brush thickness (also for line drawing).
3) Set the fill (for the paint can) - you can select a second color for the color transition, the rotation of this transition, the variation of the transition. The color transition is useful when there is an area in the image that is in various distances from the user. For example, the sea, which should be (on the mask) black in the back (it is far away) and white in the front (it is close).
4) Limit the number of colors for a more intensive 3D effect, or let the program create an image with more vivid colors (especially useful for some outdoor photos and Anaglyph encoding).
5) 3D effect: The intensity slider can be used to adjust how strong the difference in the position of the objects in the front and back will be. The shift slider can be used to move the image in front of and behind the monitor area. For a shift of 255 the entire image will be behind and on the screen (safe solution), for 0 it will be in front of and on the screen (not recommended).
6) 3D correction: if you don't hit the edges of the object accurately when drawing the mask, you can use the 3D correction boost to improve the quality of the 3D image without adjusting the mask. However, for larger inaccuracies, we recommend adjusting the mask (with a brush).
How to crop the image
Press the scissors button to switch on the trimming selection mode. Click the mouse in the image first to select the upper left corner of the cropped image, and second to select the lower right corner.
Magnifying glass
You can use the magnifying glass button to enlarge the displayed 3D image to full size to create a 3D mask or check the resulting 3D image. You can scroll through the enlarged image with the right mouse button.
Tips and tricks
1) If you double-click when cropping an image, you will see the help bars for determining the crop.
2) For objects in the foreground that are spherical (such as a ball), it is advisable to use a circular grad fill. In this case too, you must first border the object with lines.
More information and free download
If you need to use 3DJournalDX on a computer with a smaller display (e.g. a netbook), it may be useful to resize the controls by selecting the Extra-Display Size menu.
And where to download the software? For our 20th birthday we decided to give all fans of stereoscopy and 3D photography in general a gift - 3DJournal DX is now free. You can download it on this page.
3DJournal, June 2004