This time we will use SketchUp for our creation. You can download the demo version here. Run the downloaded program to install it. The demo version offers the opportunity to use all the features of the program, for many hours of work. This time will certainly be enough to create a number of interesting images.
This program seems to be functional even 20 years since we first wrote about it. However, versions of it are different now.
How to start drawing in 3D
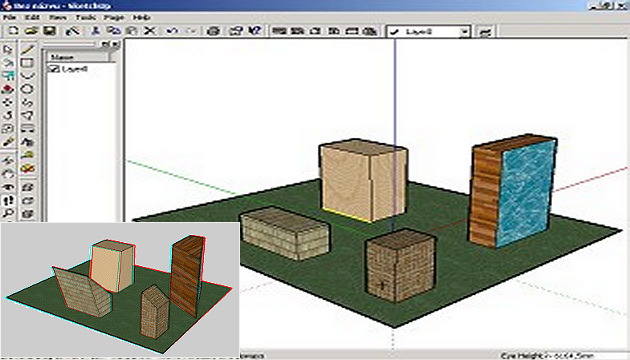
When you start the program, an overhead view of your new scene will appear in the main window. You can start drawing right away, or switch to another view. For starters, we recommend the second option - choose View/Standard views/ISO. You will now see the entire scene (empty for now) in three dimensions - spatially.
There are a number of tools for drawing, the easiest and fastest will now be to use the Rectangle - turn it on with the button with the square image on the left. Now hover the mouse cursor somewhere between the red and green dotted lines, press the left mouse button and drag upwards so that the rectangle starts to appear. You can try making it, for example, so that it is on the left and can serve as a base for your other drawings.
Now you can repeat this process a few times - you can create more rectangles in the rectangle you have already created - for example, as foundations for buildings. When you start to create a new rectangle by clicking with the mouse on a vertex (corner) of an already created rectangle - and then on another - and then moving the mouse up, a wall will start to form. Similarly, you can create a ceiling at the top of the walls.
To color the created areas, select the coloring tool - the button with the can of paint (Paint). The available materials will be displayed. Choose one and then click on the area you want to colour.
You can also edit objects you've already drawn - for example, by selecting the Move/Copy tool with the four arrow buttons, right-clicking on the edge of an object, and then dragging with the mouse. Or with the Push/Pull tool, which you turn on with the button next to it. This allows you to 'pull' the rectangle up so that it becomes a block. And of course the Erase tool (pencil with red tip).
Creating a 3D image
You can rotate, pan, zoom in and out of the image - with the seven buttons on the left with images of a magnifying glass, feet, eye, etc. - and the mouse. You can also choose one of the standard views - either with the house buttons on the top button bar or in the View/Standard views menu.
Once your scene is complete, pan it to the right corner of the window and save it as a left image (File/Export/Raster Image). Then pan it a little to the left (with the Pan tool - it turns on the hand image button and doesn't actually move the scene, but the camera - which is exactly what you need to create a stereoscopic image). The exact length of the pan depends on, among other things, the size of the scene and the desired effect. If you're lucky, the 'just a little bit' option will work. Save the image again - as a right-hand view.
The two images can be now stitched together as usual in 3DJournal. All that's left to do is to put on the 3D glasses.
3DJournal, March 2004