No, don't worry, no chemistry knowledge is needed. Just download Atomsmith from this page. It is a time-limited demo version, but it is quite sufficient for us now, we can create 3D molecules there.
This program seems to be working even 20 years after we first wrote about it. However, its features may vary.
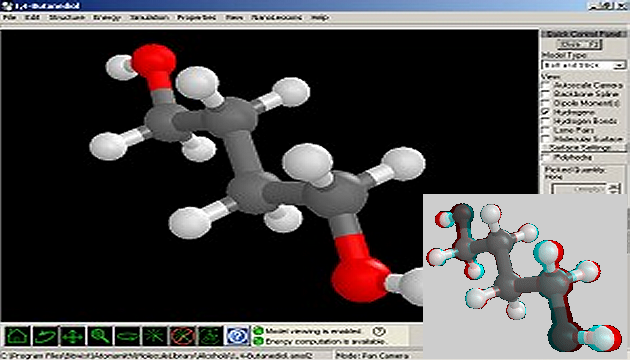
Install and run the program. Before you start creating, just a quick note on what this is all about: atoms here are the small coloured spheres that make up the larger models - the molecules of different substances.
Atoms and molecules in 3D
The user interface of the program is quite clear. There is a window in the middle where the molecules are displayed, below it there are buttons to rotate, scroll, zoom, etc. On the right there are advanced functions.
For the first experiments, the standard program settings can be used. Load one of the pre-made models, for example 1Propanol (File/Open Model/Alcohols/1Propanol.amol2). Rotate it as desired (circle and arrow button), move it far to the right (crosshair button; then press the mouse button and drag). Save the image (File/Export Graphics) as a left-hand view. Now slide the molecule to the left - about a quarter to a sixth of the screen. And save again - as a right-hand view.
Now just run 3DJournal software and upload both the left and right images. We recommend setting the mode to black and white (some standard atom colors are not suitable for 3D viewing) and then letting the 3D image be created.
In front of and behind the screen
If you leave a wide enough black border on the image of the molecule, it will be very good for 3D experiments. Try first aligning the image so that the left and right images of the atoms (spheres) of the model closest to you overlap. In this case, the 3D image appears to be entirely behind the screen.
Now try shifting the images so that the left and right images of the back atoms overlap. With the 3D glasses, you should clearly see that the image of the molecule sticks out in front of the screen. A compromise might be to have an image where the parts of the molecule that are in the middle (i.e., neither farthest nor closest to you) overlap. Then part of the image is in front of the screen and part is behind the screen (as in our image).
Just a reminder that for images that are supposed to protrude in front of the screen, the following applies: no part of the protruding image should intersect the edge of the screen; at the same time, the observed image should be large enough (and have sufficient edges) to allow it to 'protrude' naturally from the screen.
More fun
Although we don't want to replace the Atomsmith manual here, let's make at least a few more notes about working with Atomsmith. The standard settings suitable for creating 3D images, which are good to know in case you choose to use it, include the Projection/Perspective, Model type/Ball and Stick, and Color/By atom options.
If you want to create custom molecules, first clear the model space - with the Edit/Clean model option. Then choose Structure/Open Model Builder, select the molecule fragment on the right, turn Builder is Off/On and click into the image. The selected molecule fragment will be placed there. When selecting other parts, follow a similar procedure, except that the atom to which the new part of the molecule is to be attached (usually green or blue) must always be clicked on. Have fun.
3DJournal, February 2004