Yes, it is. Imagine, for example, that you have photos of a car and you would like to be able to pull the car out separately as a separate 3D object. You can then shoot it in different ways and use it in 3D images. Of course, it doesn't have to be just the car - you can get a 3D model of a building, furniture, a character...
Note from 2023: This article was published on 3DJournal 20 years ago and is no longer current. We're leaving it here as a reminder of those days.
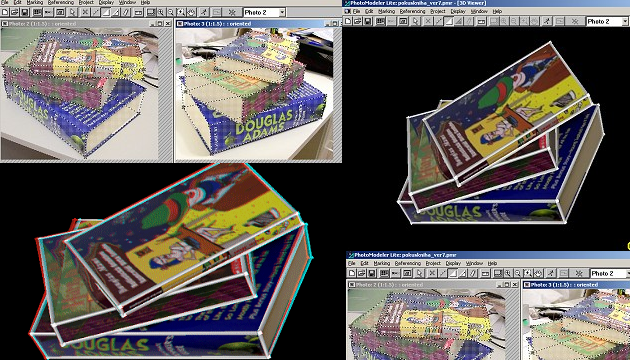
The program we'll use for our work today is called PhotoModeler Lite.
What will you need
You will need at least two photos of an object to work with the program - we recommend something simpler, like a book, to get started. Later on, you can venture into more complicated objects, such as buildings, cars or figures.
Each photo should be taken from a different side of the object, for example one from the right and one from the front. If you use more than one photo, the others can take the object from the left etc.
Preparation for work
Once the program is installed and running, select Start New Project from the menu. A list of the steps you will go through in your work will appear - don't be intimidated by it and press Next.
The next step is to select the units in which you will measure the object. Centimeters will be appropriate for the book - about 40. After pressing the Next button, you'll probably choose that you took the picture with a camera that you haven't yet entered (A new camera), and in the next step you'll choose a name for it, then the type (feel free to leave there Digital), and then the model (like Kodak DC 40).
Next, enter the size of the photos. Image size is limited in this version of the program; for regular jpg photos, 500 x 400 pixels should be fine. Skip the next step and you will be taken to inserting the photos into the program. Press the Add/Remove Image(s) button. Use the Change directory button to select the correct directory. Then click on the photos that have your object in them one at a time (we recommend really only using two the first time) and use the right arrow to add them to the project. Finally, press OK to confirm and then press Finished.
Hold down the shift key and select all the displayed images with the mouse. And click on Open photos. Your photos should appear on the program's desktop.
We mark the object
Now you need to tell the program how your object is bounded and how the two photos are related. Click on the stick at the top with the crosses at each end (Line Mode - Ctrl + L). And use your mouse to select the object. In the case of a book, simply click in one corner of the book, then in the other (the two corners will be joined by a line - this should go along the edge of the book), in the third, and so on. You can stop marking at any time by right-clicking - and then resume by clicking on any point already marked - that is, any corner of the book already marked. Mark all corners and all edges of the book in this way. Even the ones you can't see - guess their position.
Now you need to do the same in the second picture. But first select Edit/Select All Marks in the menu. This will select the entire marking of the object in the first image. Click on the double-crossed line button (Reference Mode - CTRL +R) and hover over the second image. At the same time, the first point in the first one should be highlighted in yellow. The same point should be marked in the second image. If it is the top right corner of the book - right above the title - it must be this corner in both the first and second image. Mark all the points in turn.
Converting into 3D
Now you can try to convert the object to 3D for the first time. Click on the button with the figure, then on the Yes and Process buttons. Confirm and close the chart window. Select Project/Open and 3D viewer from the menu, check Points and Lines and confirm. Your object should appear - just in the form of lines for now.
If you press the mouse button on one of the three markers on the bottom right and drag, the object will move, rotate, or zoom in or out. Once you've tried everything out, you can close the 3D viewer window again.
Coloured surfaces
Now you still need to give your object the right surface. Click on the triangle button (Surface mode, CTRL + E) and select the surfaces in any of the images. Each surface is shaped like a triangle (a rectangle - for example, the top of a book cover - will consist of two triangles).
Always click successively on the three points that lie on one face, then on the next, and so on. The selected faces are marked with dots. Mark all faces in this way (even those that are invisible because they are at the back).
And open the 3D viewer again. This time, however, check both Surfaces and Photo textures. If you have followed the correct procedure, your object is now in front of you in all its glory. (Beware - if any part of it is hidden so that it is not visible in any photo, the program will obviously not recognize its shape or colour - so for better results, it really is a good idea to use multiple photos.)
Using 3D glasses
You can photograph the created object as you wish and of course also make an anaglyph - a 3D image for your 3D glasses. Just move the object to the right, select the Print Screen key, paste it into your graphics editor (in the Edit/Paste menu) and save it as a left image.
Then move the object a little to the left in your 3D viewer (the exact shift will depend on the size of the object, among other things) and repeat the process - but this time save it as a right image. Now upload both images to 3DJournal and have a 3D image created.
You can export the created objects from PhotoModeler in several formats and then use them in other 3D programs. A properly rotated image of an object can also add a nice touch to any of your 3D collages.
3DJournal, March 2004