To create Lego images, we will need specialised software. There are several different programs available, and after a number of tests we have chosen the LDraw package, which you can download on this page.
This program seems to be working even 20 years after we first wrote about it.
After downloading the program, install it - just a basic install that loads MLCad, LDView, helper programs and the necessary parts libraries. Once MLCad is running, you still need to set up the directory where the application was installed - usually removing the Apps/MLCad folder from the options offered is sufficient (make a note of the folder you set up, it will come in handy later). Once its interface is shown, move the toolbars with your mouse the way you need them and you can start creating.
Creating a scene
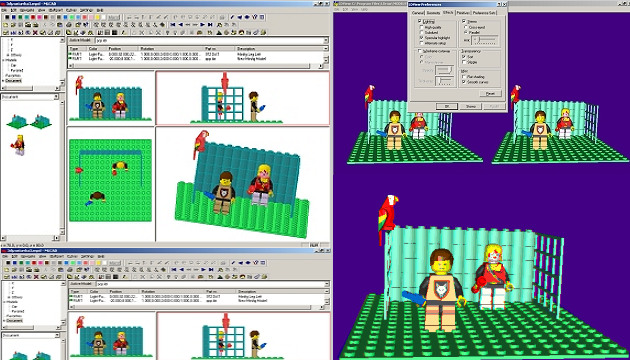
You can start creating your 3D image by selecting the first suitable Lego cube (in the top left corner there is a window with a list of parts libraries - if you select one, all the cubes from the library will appear in the bottom left corner). Grab the cube with the mouse and drag it to one of the 4 windows in the bottom right corner. Each of these windows shows the image from one angle - top, left, front and 'camera' view.
The cubes can be stacked on top of each other or side by side. To make things easier, we recommend that you lay the baseplate (Baseplate library, you can choose, for example, 16 x 16) first and build on it. You can also find more complex objects in the libraries - like the parrot (Other Parts/A library).
You can also create a lego character - by clicking on the head button. In the window that appears, each box around the figure relates to a body part - you can adjust its shape and colour. For example, hat sets the headgear (hat, but also hair), left hand accessories sets the accessories for the left hand (for example, revolver). To insert a dummy into the document, check the New sub model option and select OK. Then select Document in the drop-down list in the middle left. The dummy and your original scene elements should appear in the bottom left window. Before dragging the mouse to the dummy, we recommend that you merge all of its parts into a group (select it and choose Edit/Group/Create). That way you can still move him as a whole and not in pieces (so you won't accidentally take away his legs, for example).
If the new scene doesn't fit in one of the viewports, right-click here and select Zoom/Fit. Note that in the bottom right box, you can drag the mouse to rotate your scene in different ways.
Spatial image
When you're done creating, export the entire scene with File/Export (leave the default options set). Now let's move on to the second installed program - LDView.
Also, LDView will ask you at the beginning to specify the folder where the programs were installed. Insert the same one as for MLCad.
In LDView you can view your model in detail - and also conveniently shoot in various ways. If you need to set the scene to a basic position, select View/Viewing Angles on the Front. To create a 3D image - an anaglyph - set the Stereo/Parallel option in Edit/Preferences on the Effects tab. Use the slider to set the optimal rotation of the views, we believe that the values on the left of the slider - usually at the first line - work well.
Save the image (or use the Print Screen key to remove it directly from the screen) and split it into left and right parts in the graphics editor. Use 3DJournal to combine them into one 3D image. (You can also upload the resulting image to 3DJournal with both views - as left and right - and then move one of them horizontally a lot in the program).
If you are interested in the 3D animations, then it is certainly worth considering trying to create one using 3D Lego. Have fun.
3DJournal, January 2004