All video and animation exploits the imperfections of the human eye. While in the real world objects move continuously, in video (or animation) the movement is made up of a series of successive images, each of which shows the moving object moved by a short distance. However, the eye does not perceive these images individually, nor does it perceive jerky motion - if certain rules are followed, it sees everything as normal motion.
Note from 2023: This text was originally published 20 years ago, and it's safe to say that today you can create beautiful animations more easily with 3D rendering software and some video editing software.
So if we want to create an animation, for example a ball flying over a field, we need to have an image of the background (the field) and the ball. From these, we will create several images in turn - each of which will have the ball displaced from the previous image.
In addition, if we want to create a 3D animation, all the individual images must satisfy the conditions of a 3D spatial image - so we need to create each of them for left and right views, and then merge them into an anaglyph (or other type of stereoscopic view). A series of anaglyphs (3D images) in a row will then produce an anaglyph animation.
Individual anaglyph images can be created in several ways. It is possible to have them computed, to create one of them and place a moving object into it via collage, or to use some software that can make an anaglyph animation directly.
Creating 3D animation
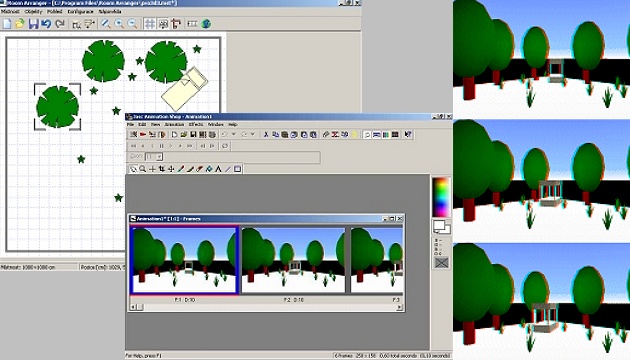
For our example, we have chosen the first method mentioned above. We used Room Arranger, but you can use any program that allows you to move the camera. Here, we've created a scene with trees and plants, among which a moving bed arrives (perhaps inspired by Fantomas?).
The scene is 1000 x 1000 centimeters, and we placed all the objects in its upper right part and the camera at a 45-degree angle (towards the upper right corner) at positions 50, 950 for the left image and 60, 960 for the right image (by camera here we mean the observer's point, which is set when the Explore in 3D button is pressed).
In the first scene, we have placed the bed in the upper right corner. We took a shot from the left and right and created an anaglyph. Then we moved the bed a little closer to the observer and repeated the whole process. This way we created 6 anaglyphs in turn - in each of them the bed is closer to the user (and sometimes it is rotated a little differently).
When composing the anaglyphs, you should always choose the same horizontal offset for the left and right images (we recommend to test the most suitable one on the first image). Vertical shifting is not necessary. If images need to be cropped, make sure that you crop them all equally (so that the crop starts at the same point and the images are the same size).
We're going to the finals
To complete the animation, we recommend using a graphics program that can work with layers and can animate them. For example PaintShop Pro. Load all the images into it and then place them sequentially in different layers of one image. How?
Take the first image, select Layers/New Raster Layer/OK and paste in the second image. Select Layers/New Raster Layer/OK again and paste the third image. And so on. In the case of PaintShop, then save the image in PSP format and launch the Animation Shop (File/Jasc Software Products/Launch Animation Shop).
Here in the File/Preferences/General Program Preferences menu, check the Keep Layers as Separate Frames option under the Layered Files tab. Open the saved animation image file. They should appear as movie fields side by side. If you now press the movie strip image button on the top right, the animation should be shown.
You can set the duration of each frame (Frame Properties/Display Time) using the right mouse button. The resulting animation can be saved as a GIF (we recommend setting 255 colors). If you have problems with color rendering, you can try reducing the color of the original image to 256 colors in PaintShop (Colors/Decrease Color Depth/256 Colors) and save its palette (Colors/Save Palette). You can also save the resulting animation in a number of other formats, where the color problems are eliminated. However, it may be more difficult to show them on the web.
3DJournal, January 2004