What are 3D collages good for? Just for inspiration: you can use the following procedure to create, for example, 3D images of a child sleeping in a flower, your girlfriend (boyfriend) in a 3D rendered apartment or, conversely, a 3D character standing with you on a beach by the sea.
Getting started with collage
Let's suppose you have a 3D image at this point - a 3D photo, for example. You want to add other objects to this image - maybe a 3D object or part of another photograph.
You'll need a graphics editor. The object you want to insert into the image should be cropped. If it's a rendered 3D character, for example, this will be easy - just click on the solid background with the magic wand, which is commonly available in most graphics editors, and it will mark the background as a selection. Then just delete the background or choose something like Selections/Invert - which will select the character instead of the background. You then copy it to the clipboard (Edit/Copy) and from there to the final image (Edit/Paste).
A little bit of 3D theory
The most important question is where to place the new object. Take a look at the diagram on this page. The letters L and R at the bottom of the diagram represent the left and right eye views. The horizontal coloured bar above each eye schematically shows how the image is projected 'into the eye'.

The horizontal colored bar above each eye schematically shows how the image is projected into the eye.
Both eyes can see the large blue area, but only the left eye can see the smaller yellow area and only the right eye can see the smaller green area. Notice how the two eyes are shifted relative to each other - the right eye sees a little more to the right, the left to the left.
We have placed a red ball in front of the base image (indicated by the coloured rectangles). There is a ray leading from both eyes to it - the rays intersect in the sphere. Note that for the left eye is the sphere hides the yellow rectangle of the back image, for the right eye the brown rectangle. The right eye sees it a little more to the left, the left to the right.
The resulting view of both eyes is indicated in the lower right corner. The closer the sphere is to the observer, the more it will be displaced in the right and left views.
Let's compose the 3D image
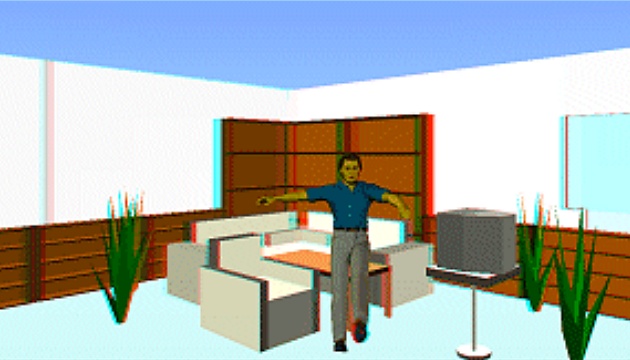
And now let's create the first collage. We used images described in other articles here - an image of an apartment and an image of a 3D object - a character.
At the beginning of the work both base images (in our case left and right image of the apartment) should have the same size and should be correctly tilted - so this time we do not recommend to make any further adjustments in 3DJournal - except for horizontal shift. If you are working with photos and it turns out that you need to correct the position (or tilt) of the left and right photos, then make those adjustments in the graphics editor before you start creating the collage.
The amount of displacement of an object between the left and right images determines its position in space.
Now take the left and right images - for example, our 3D apartment. If necessary, adjust the size of the figure to fit with the other things in the apartment. Paste the left image of the figurine into the left image of the apartment at the desired location (for example, in front of the table). Remember exactly what position you have pasted it in.
Now paste the right image of the figurine into the right image, at exactly the same height. Note, however, that we move it a little to the left (because, as we said, the right eye sees things in the foreground a little more to the left). If you're working with an image where there are multiple objects (like our room), you can estimate the shift (in our case, the figure is just a 'small piece' in front of the table/chair, so just move it a 'little bit').
If you need to determine the displacement accurately, we recommend that you draw a diagram similar to ours and mark the distance of the new object from the background (or other objects in the image) and other distances - and then you can see what the new object is hiding in the background (like our ball hid the colored rectangles) and how to move it in the resulting images.
Completing the 3D collage
Combine the created images into one, for example in 3DJournal software, and just move them horizontally so that they look spatially exactly as you want.
3DJournal, December 2003