Human (and, after all, animal too) characters have the disadvantage, from the point of view of most mortals, of requiring some artistic talent to create them. Or special software. We'll take the latter route and use Poser, whose working demo you can download here in the Downloads section.
This program seems to be working 20 years after we first wrote about it. However, the controls may be different.
Select the Windows version and install.
How to work wit it
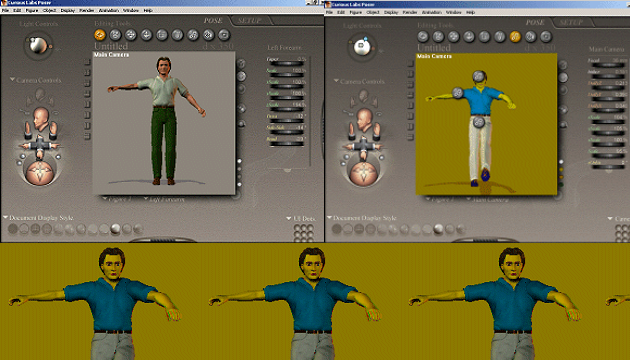
When the program starts, a window with one standard character (male) will open. Around it are a number of controls that you can use to move the character, change its colors and generally customize it.
Above the character you will find the following tools: rotate - rotates a selected part of the body (for example, the arm up); twist - twists a selected part (for example, when you turn the palm up and down or the foot with the toe forward or sideways); translate/pull - pulls the body behind the selected part sideways; translate in/out - pulls the body behind the selected part forwards and backwards (out of or behind the screen); scale - enlarges or deforms a body part; taper - deforms a body part by making it narrower or wider at one end; chain break - breaks a chain of body parts that are used for other operations (for example, click there to place a new break in an arm and watch how the effects of translate/pull change without and with it); color - color the body or clothes with a color (selected from the palette when you click on the body); grouping tool - groups body parts for certain operations.
Next to the character window on the right, you can set some display properties - at the top, for example, the display of shadows, and at the bottom, for example, the background or foreground colour. Then, further to the right, you can adjust various parameters based on the tool you just selected.
Through the Windows/Library menu, you can view the library of some objects (not many in the demo version) and change the hairstyle of your figure, for example. You can also quickly change its stance or add another object to it.
Just to the left of the figure window are tools for switching the view, and further to the left are tools for working with the camera that captures the figure. The hand images are used to move the camera in the appropriate direction, the ball with arrows is used to rotate it, and the head and limb image at the top is used to select the camera (for example, face-focused, full-body, etc.). On the top left you can adjust the lights pointing at the character, or add new lights (and of course take them away).
Below the image on the left is a set of buttons to toggle the way the character is displayed (wireframe model, shadowed model, etc.), and directly below the image is the animation panel drag. You'll also notice a Setup tab in the upper right, which lets you rearrange the bones in the character's body (really, literally).
There are a lot of options that Poser offers - and since this article is not intended to replace its user guide, we can only mention the most important ones. For example, just for fun, try the menu item Display/Figure style/Cartoon, which will display the figure as if it were a comic book, Display/Paper texture/Grain, which will change the surface of the background (the paper on which the figure is 'drawn'). In Figure/Figure height, you can set whether your figure is an adult or child-sized, whether it is muscular, and so on.
Using 3D glasses
When your character is finished, you can let the final image calculated - select Render/Render from the menu. Of course, that's not all, because our goal is an anaglyph, a 3D character that can be seen with 3D glasses. So we need to create a shot of the character with the left camera and the right camera.
We recommend the following procedure. Render the image. Save it (for example, using the Print Scrn key and the graphic editor, where you paste the contents of the clipboard after this operation). Move the camera to the right - preferably using the Dolly X bar to the right of the character window. If you haven't moved the character close to the camera and moved the scene too much, a 40 unit shift might be appropriate (we recommend experimenting - it depends on other properties of your scene). Render and save this image as well.
Now just paste the two resulting images into 3DJournal and stitch them together. If you've taken them with the Print Scrn key, it will certainly still be useful to crop around the character with the controls.
There are a number of other additional tools and objects for the full version of the program that can be downloaded from various places around the web. We wish you many beautiful custom 3D figures.
3DJournal, December 2003