Today's mobile phones usually create 3D photos by simply taking a picture of a scene and then calculating what it would look like from the left eye and the right eye.The results aren't bad, but you'll often notice that the calculated parts of the image are far from perfect.
For professional 3D photos, special devices are recommended, such as those with two identical lenses. From time to time there are also 3D cameras available on the market for amateur photographers, but it is not often. It always depends on the current situation - whether 3D photography attracts the attention of the general public or not.
Fortunately, there is another option: to take 3D photos with a regular camera or mobile phone - using a special process so that the photo doesn't miss anything. And that's what the following lines will talk about.
What is 3D photography
Before we get into the actual photography, let's spend three short paragraphs on the introduction. First, let's briefly consider what exactly will be the result of our efforts - people often have different ideas of what a 3D image is. So: while conventional pictures are flat, 3D photographs capture the depth of the scene being photographed. They therefore appear plastic. But the name 3D is a bit inaccurate - they are actually so-called stereograms. You can see the objects in them plastically, but you can't turn the photo around and see the backs of the people you're photographing on the back of it. So it's not really a 3D record.
3D photographs capture the depth of the scene being photographed. It therefore looks much more real.
Any digital camera can be used to take 3D pictures, including a mobile phone, but also a film camera, a video camera, a webcam, etc. The same applies as in traditional photography: the better the device (and the photographer, of course), the better the photo. The photographed scenes need to somehow get into the computer. With a digital camera and a digital video camera this is not a problem, with a conventional camera you will need a scanner or a photo lab to store the developed photos on a CD-ROM. Along with an analogue camera you can use a special card for the computer that allows analogue video input. The best choice is undoubtedly a digital camera or a mobile phone with a good camera.

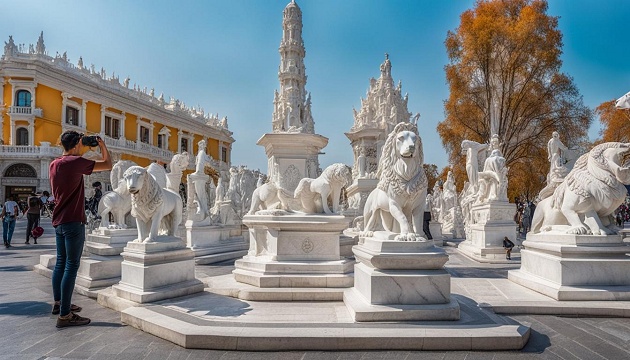
Example of a 3D photo in Anaglyph format for red-blue glasses. Shot from France Miniature. Photo: Petr M., 3DJournal
You can then use a special program available on our website to edit the obtained photos on your computer. 3D photos can be viewed with special glasses, which can be bought for a few crowns on the Internet, for example on one of the well-known Chinese marketplaces. Note that we are dealing here with the creation of 3D photos using the Anaglyph method (with red and blue (or cyan) glasses), which is affordable for most users, but similar procedures can be used for other methods. We will mention these in other articles in our magazine.
Get Started
The first steps of taking a 3D photo are the same as for normal photography. You choose (or arrange) the scene to be photographed. In order to get a 3D (stereographic) photograph, you now need to take two different views of the scene. Just as if you were photographing it first with one eye and then with the other. So, after you take the first shot (for example, with your 'left eye'), you move the camera (or the movie camera, smartphone etc.) a little to the right and take the second shot. You can use a tripod, but experience shows that this can be done without one for casual photography.
You should hold the camera at the same height and tilt for both the first and second shots. If you rotate it between shots, for example, so that it points more towards the ground or sky, or so that the scene is tilted differently (falling to the left or right), it will be harder to finish the 3D photo. If the rotation is too strong, it may make creating a 3D image virtually impossible. A useful tip on how to easily ensure the best shift between photos can be found below.
Selecting a scene for 3D photography
Scene selection is a little bit more challenging in 3D photography than in conventional photography. In order to make the spatiality of your shot stand out, it is advisable to have objects in the photo that are at different distances from you. For example, if you are photographing mountains in the background, there should be a lone rock or tree in the foreground. It will then be the one that stands out in the foreground of the resulting stereoscopic photograph.
To make the spatiality of your shot stand out, it is advisable to have some objects in the foreground.
The situation is a little easier when you are photographing in a room. There are usually some subjects closer and others further away. For example, a birthday cake in front of a group of children in the background.
And with the mention of children, we come to one more condition that must be met in stereographic photography. The scene must not change between shots. If one of the subjects escapes or moves between photographing of the left frame and the right frame, the result will no longer be a photograph of the same scene from different angles, and therefore it will not be possible to create a 3D photograph, or the result will not be great. Fortunately, in normal photography, people are used to being still, so it's usually no problem to get them to stay still a few seconds longer. But it's worse with animals, for example, where you usually can't do without a special stereo camera.
Taking a photo
Once the scene is set, we get down to the actual taking of the photos. For photographing common scenes, it is recommended to move the camera (between the first and second frame) by 7 centimetres, which is a common eye distance. After a few tries, you'll find that if the closest objects are further away, you can move the camera more, but if you were photographing an object only half a metre away, for example, even 7 centimetres would be too much.
In practice, there are two recommended ways to take photos, but the first step is the same: You choose a point in the scene (a lookout tower in the distance, a tree in the foreground, your uncle's belt buckle). Then you either take both photos so that this point is exactly in the middle, or you move it exactly as far as the camera moves in the second photo - and we recommend the second option, because it gives better results. You can see it well here in the picture (the first option marked as A, the second as B). Remember that if the selected point is in the distance, the shift is actually minimal. If you move the camera 7 or 10 centimetres, you won't even be able to see that small distance on a distant lookout tower, which may be the target of your photography. So feel free to keep aiming at the same point.

Aim the camera lens at the subject and press the shutter button. Then move the camera to the right and shoot again. Sometimes it is recommended to aim at the same point (A), but in our experience, simply moving the camera, option B, gives better results. Image: 3DJournal with help of getimg.ai
Does this procedure sound complicated? Fortunately, it can be simplified even further. For normal photography, simply take a photo, move your camera or phone about 7 centimetres to the right and take a second photo. In most cases, this is sufficient.
Tips for 3D photography
The easiest way to easily take a good 3D photo is this:
1) When looking for a good shot, remember a point on the foreground object (a rock, a person, a tree) and try to place it next to a mark you see in the camera viewfinder, such as the cross in the middle. Some cameras have different markers in the viewfinder that can be used to do this.
2) Stretch out to get a stable position. Take the first shot.
3) Without moving your body, move the camera to the right 5 to 10 centimetres.
4) Check that the selected point is back in place on the vertical axis of the frame (and still at the same height), for example at the cross in the middle. Take a second photo.
If you are using a manual camera, we recommend that you set it up so that the shot is as sharp as possible. A setting where only the main subject is sharp and the surroundings are blurred is not very suitable for stereo photography. Fortunately, most automatic cameras shoot this way - so that the whole scene is as sharp as possible.
Creating a 3D photo
After transferring the photos to your computer, run the 3DJournal program, which you can download for free on our website. It is easy to use. Just press one button on the right edge of the main window after another.
Use the first button to upload the left photo. Upload the right one with the second one. Use the third one to create a 3D photo. The resulting image should show the original photos with the various blue and red 'ghosts'. Look at the image with 3D glasses. Isn't that exactly right? Never mind, you can easily fix the photo.
The resulting 3D photo is simply three mouse clicks away.
Because taking 3D photos with a single camera without a tripod can cause all sorts of unwanted shifts and rotations, we've equipped our 3D image creation software with a number of editing options. Using the up and down, right and left arrows, and the rotate buttons, you can adjust the photo to give the most perfect spatial impression. You can also choose whether the resulting image should be black and white or colour, or have less saturated colours. And then the only thing left to do is to save it...
Detailed information on how to use 3DJournal can be found in the next article on this site.
In conclusion
And that's it. We recommend you try taking several different photos - you can not only choose different scenes, but also, for example, create one left shot and multiple right shots for one scene - with different camera shifts or even different aiming. However, unless you choose a complicated scene right from the start (for example, shooting very close objects) or make a major mistake (tilting the camera too much, taking a second shot in a completely different direction than the first), we believe you'll get your 3D photos right away.
Of course, in this text we couldn't describe everything that is related to creating 3D photos (there are many interesting 3D topics - collages, photographing close objects, creating 3D photos with special tools etc.). Many interesting topics are covered in other 3DJournal articles.
3DJournal, June 2003


