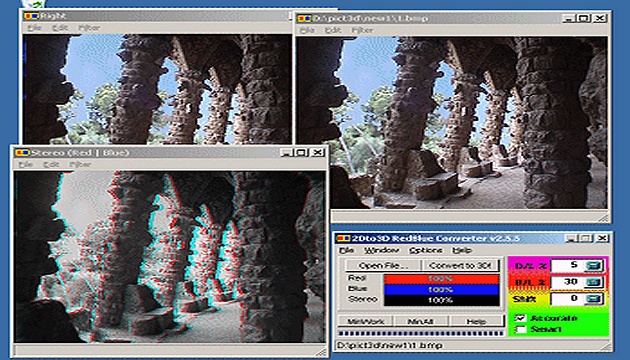
The program we recommend for converting 2D to 3D photos (or, more precisely, stereographic photos) is called 2Dto3D RedBlue Converter. It works by 'inspecting' the supplied photo and trying to discern which parts of it are more in the foreground and which are in the background. Based on this, it then creates a new photo - a stereographic photo that can be viewed with blue-red glasses. When it gets the parameters right (fortunately it only has 3 basic ones), it usually gives good results. Of course, the quality of a particular image depends a lot on what's in it. Our experience shows that the program usually does well with photos of people and buildings, but less well with some natural compositions.
Note from 2023: This article was published on 3DJournal 20 years ago and is no longer current. We leave it here as a reminder of those times.
The freely distributable version of the above program may be used for non-commercial purposes, and is limited to 14 days. You can't save images created from it, but if necessary you can save them 'from the screen' (using the Print Screen key and then paste them from the clipboard into a graphic editor - Edit/Paste).
How to do it
The process of converting a regular photo to 3D is simple: Use the Open File button to upload the image. Then set the parameters. If there are people in the photo, a value of 10 works well for us. B/L indicates the stereo base - and therefore the intensity of the 3D effect. We recommend setting the highest value at which the resulting photo will still be clearly observable (we have found 30 to be a good value for normal use).
Shift indicates the additional mutual shift of the images and here we recommend a value of zero. While a higher value should increase the impression of perspective, for us it rather impaired the overall recognizability of the image. We recommend leaving the accurate and smart options unchecked - using them improves the quality of the photo. Only in rare cases they could cause problems - if the built-in intelligence of the program fails on some photographed object.
And after setting the parameters, just press the Convert to 3D button! The result are images from the left, right and the resulting image for stereoscopic glasses with red and blue transparency. The resulting photo is only black and white, if you would like a colour version, you need to save the images for the right and left eye and create a 3D image from them, for example in our 3DJournal software.
3DJournal, September 2003