3D photo and 3D video cheap with Yi Discovery

When you can sync two cheap action cameras, you can easily record 3D video. Here are our tips.
Share:

When you can sync two cheap action cameras, you can easily record 3D video. Here are our tips.
Share:More and more people use virtual reality headsets now, such as Oculus Go, and making VR and 3D content is more popular these days. How to make it cheap? For example, you can use Yi Discovery cameras that cost less than $50. But how can you synchronize the cameras?
Yi discovery action cameras are good because they are cheap, have a decent image quality and cover an angle of about 150 degrees. To create basic VR panoramas, you can even use just one camera (here are tips on how to easily create a 360-degree VR panorama). For 3D images, however, you need these two cameras synchronized. And for 3D panoramas, you need even more synchronized cameras.
Unfortunately, Yi Discovery cameras do not offer any software synchronization, so we will have to open them. Beware, it's just at your own risk, the cameras may be destroyed. You'd better read this entire text before deciding whether to try it.
However, the camera can be easily open. You can gently and carefully bend the front cover of the body, then unscrew the four screws and remove the electronics. Note that when done, you have disconnected the display accidentaly too, which is a big problem, because its connection back will complicate putting the camera back together. But we haven't found another way how to do this all.
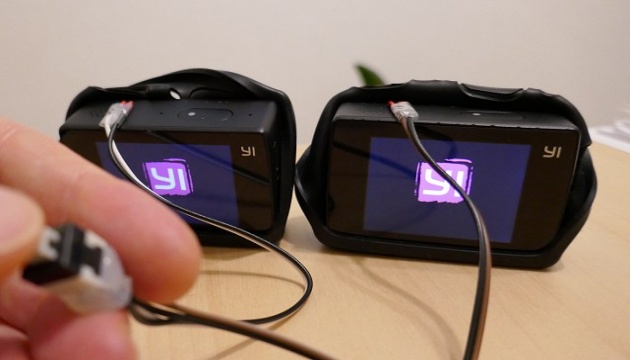
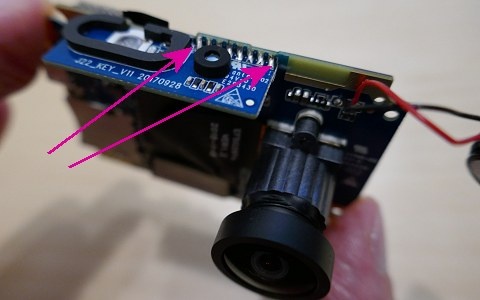
 By measuring, we found out that in our yi Discovery cameras we can simulate the shutter release button by connecting the two extreme (the most left and the most right) contacts on the shutter board. We assume, but we do not guarantee, that it will be the same in all these cameras. We connected wires to these contacts and took them out of the cameras - and connected them to the two-pole switch, so the cameras are still electrically isolated, but when the switch is pressed, they both take the picture or start recording the video - synchronized. We would like to sync the cameras with software, but we do not have enough documentation to try something like this unfortunately.
The disassembled camera can be seen in the picture here. Perhaps everything important is visible on it. The arrows lead to the contacts we used to sync the shutter. Again, we repeat that everything is without warranty, and any modifications to your cameras are at your own risk.
Unfortunately, it is necessary to gently remove (pry open) the display now, then insert the electronics, connect the display to the display connector (the connector must first be opened by the lever and closed when the contact strip is inserted), return the display to the place, screw in the electronics and snap the front cover.
Now just put the two cameras next to each other (or create a bracket for them) and press the switch to make both of them at once to take a pictures or shoot a video - which you can then use to make your 3D movie or 3D photo. Because of the wide angle, you can also create simple 3D panoramas, even though cameras with a slightly larger angle would be more suitable for this purpose.
We have tested the 3D camera in the field and the results are very decent. We used the ffmpeg software to compile shots from both cameras, specifically with the following command:
ffmpeg.exe -i left.mp4 -i right.mp4 -filter_complex [0:v]pad=width=2710:height=2710:x=75:y=635:color=black[leftx],[leftx]scale=iw:ih/2[left],[1:v]pad=width=2710:height=2710:x=75:y=635:color=black[rightx],[rightx]scale=iw:ih/2[right],[left][right]framepack=tab stereo.mp4
The result is a video made of left and right videos and black bars, so that you can watch it in your Oculus Go (or any other VR headset) for example in the Samsung app as a 180-degree video. In our opinion, the results are very decent. You can also use our 3DJournal Software to create 3D images, of course (see the links above).
3DJournal, December 2018