It is a program called 3DJournal - it has the same name as our website. For our 20th birthday, we decided to give all fans of stereoscopy and 3D images a present - 3DJournal is available for free download in its full version. And how to work with it?
Creating a 3D image
To create a 3D image, 2 images are always needed - one showing the scene from the left eye view, the other from the right eye view. You can read about how to take them in our other articles. Upload both images to 3DJournal by pressing the buttons on the top right. Each uploaded image will be displayed in its own window. Press the Create 3D Image button to create a 3D image. This shows the 'colour ghosts' that allow eyes with glasses to perceive the spatial image. The corresponding menu items can also be used instead of the buttons.
Editing 3D image
If the left and right images were not taken accurately and each is, for example, rotated differently or is of a different size, it is now advisable to make adjustments - to make the resulting 3D image as good as possible. Proceed as follows:
1) Are the objects in both images the same size? If not, adjust the size of the left image using the four buttons next to the Size label.
2) Are the red images of the same objects the same height as their blue (blue-green) images? If it is different in the right and left part of the images, use rotation/rotation. Rotating to the right raises the left part of the photo and lowers the right, rotating to the left does the opposite.
With the right tools, a 3D image can be fine-tuned to perfection.
3) Now use the buttons to move up and down to place different ghosts of the same things at the same height.
4) Finally, use the horizontal scroll buttons to move the images well to the right or left in relation to each other. We recommend putting on 3D glasses and scrolling until the 3D photo is clearly visible.
Tip: To align the position of the two images more quickly, press the button with the four arrows, click in the main (3D) image first on the selected point in the left image and then on the same point in the right image. This will scroll the image faster than using the standard arrow keys.

Converting to 3D step by step
Saving of 3D image
Finally, save the 3D photo. You can either save the whole photo or just the selected cutout. You can also resize the photo before saving. But more on that later. The format in which the image will be saved (bmp, jpg, png, jps, pns) is selected in the save window. For special stereoscopic images jps and pns, the left and right images are saved side by side crosswise (right left, left right). For other formats, the selected 3D image color coding is used.
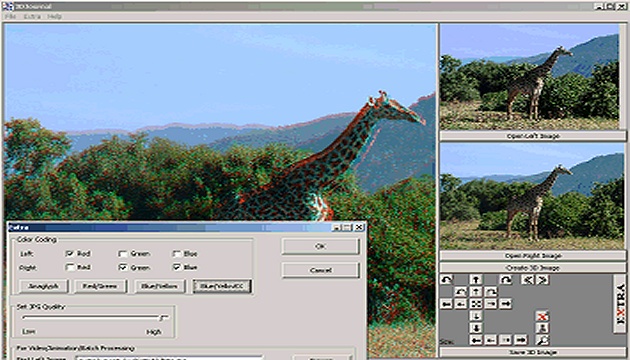
Extended functions (Extra button)
You can use the Extra button to call up the extended functions of the 3DJournal software. Here you can:
* Set the color coding of the image - the default is anaglyph for black/blue-green glasses, but can also be coded for blue-green glasses and others.
* Set the quality of the saved jpg image. We recommend choosing a higher quality to allow for a better 3D effect.
* Create many 3D images at once - for example for creating animations or videos.
* Save the current settings. Saves the relative offset, size and rotation of the images, jpg quality, 3D encoding method, color suppression settings and any cropping for animations. So you can go back to edit any 3D image at any time or save settings for later 3D video creation.
Extended functions 2 (X2 button)
Use the X2 button to open the 3DJournal advanced tools panel. The selected functions are executed immediately. Here you can:
1) Set the image resizing when saving. This is very useful, for example, when preparing 3D images for HD video.
2) Flip the left or right image upside down (useful if you need to take photos with the cameras inverted to each other) or swap the left and right images. If the images have different resolutions/size, you can have them automatically unified with the auto-resize option (the larger image is reduced in size).
3) Limit the number of colors for a more pronounced 3D effect, or let the program create an image with more vivid colors (especially useful for some outdoor photos and Anaglyph encoding).
Cropping the image
Press the scissors button to switch on the trimming selection mode. Click the mouse in the image first to select the upper left corner of the cropped image, and second to select the lower right corner. Cropping the image is definitely recommended, especially when saving to stereoscopic jps and pns formats.
Magnifying glass
You can use the magnifying glass button to enlarge the displayed 3D image to full size and precisely align the left and right images or adjust the crop. Press the button again to display the image in the standard way. If you click in the right part of the image when zooming in, the image will move to the left, and you can similarly click in the left, top or bottom part of the image. For larger images and multiple operations, the image may take a while to scroll.
3D animation and 3D video
To create 3D animations and 3D videos, we recommend the following procedure:
1) Save the animation/video images from the left view in one folder on the disk and the images from the right view in another folder. How to create such images can be found in another of our articles. For example: Levy001.gif, Levy002.gif, Levy003.gif and Pravy001.gif, Pravy002.gif, Pravy003.gif and so on.
2) Upload the first left and first right image to the 3DJournal software and perform all operations (including saving) as if you were creating a regular 3D image.
The 3DJournal software can also help you create 3D animations and 3D videos.
3) Use the Extra button to call up the advanced features. The names of the first images to be converted are already pre-populated here, so just fill in how many images to convert and press the Start Processing button. During processing, all images are edited in the same way as the first image - including shifting, rotating, cropping, etc.
4) The finished images can be reassembled into a video or animation - using a video editing software.
Tip: A pair of double-arrow buttons allows you to move forward (e.g. from 001.jpg to 002.jpg, 003.jpg, etc.) or backward in numbered images. If you hold down the Shift key while pressing them, only the left image changes. This makes it easy to synchronise images from two unsynchronised cameras.
Tips and tricks
1) How to prepare a 3D video for YouTube: For saving in this case, choose the jps format and HD or Full HD size. Convert from the images to video. After uploading to YouTube, follow the rules for stereoscopic (3D) videos on YouTube or the instructions on 3DJournal.com.
2) Whenever you compose a new 3D image, the pan, rotate, etc. parameters are reset to zero. This is useful when processing a number of different shots, but sometimes you may just want to swap the left image for the right without zeroing the shifts. Then do the image file swap in the Extra menu.
3) If you double-click when cropping an image, you will see the help bars for determining the crop. When you are finished cropping, double-clicking will return you to selecting the lower right corner of the crop - so you can select it elsewhere if you wish.
4) If you need to use 3DJournal on a computer with a smaller display (e.g., a netbook), it may be helpful to resize the controls by selecting the Extra-Display Size menu option.
What the latest version of 3DJournal has brought
Let's summarize here what the latest version of 3DJournal has brought compared to previous versions. You will find mainly the following new features:
* The 3D vivid color feature will improve the color rendering of many images, especially from nature.
* 3D photos can now be adjusted not only with the arrows to pan or rotate images, but also with a single button with four arrows. Click it, then click on a selected point on both the left and right images and the images will be set correctly to each other.
* 3DJournal allows you to work with 3D video converted to single images. Now, thanks to a pair of double arrows, it allows you to scroll forward and backward through individual frames, so that video from the left and right cameras can be synchronized much more easily.
* The resulting frame size can be easily adjusted, even to predefined HD and Full HD sizes.
* A magnifying glass has been added, cropping has been improved, and any of the input images can easily be flipped upside down (useful if you have a 3D stand with interfaced cameras).
* 3D photos can be saved in stereo jpg and stereo png formats. This is useful today, for example, when preparing 3D videos for YouTube, but in the future we expect to see support for them from 3D TV manufacturers, for example.
Where you can download the 3DJournal software for free
As mentioned above, for our 20th birthday we decided to give all fans of stereoscopy and 3D images a present - and 3DJournal is now available for free download in its full version. You can download it here.
3DJournal, June 2003